Table of Contents
Outlook 2016 / 2019
This guide shows you how to set up the GWDG-Exchange account in Outlook 2016 under the Windows operating system. The setup of Outlook 2019 is basically the same.
To set up the Exchange account, your computer must be connected to the Internet, as the setup process is typically done automatically by an AutoDiscover function. The first time you start Outlook, a new profile is created, if you start your Outlook for the first time follow the section Outlook Configuration. If the automatic operation is not successful, or an additional Outlook profile should be set up, follow the instructions below and start you Outlook 2016 configuration with creating a new profile.
Create a new profile
1) From the Control Panel choose an E-Mail (32-Bit) / Mail icon.
2) In the Mail-Setup dialog choose Profile… button to configure an e-mail profile for the Exchange.
3) In the E-Mail dialog box, click the Add … button to create a new profile.
After entering the profile name, an Outlook Setup Wizard window appears. In the Setup Wizard, select Email Account and type in your name, e-mail address and password into the corresponding fields.
If you have multiple profiles, you can activate the option Confirm profile to be used, when activated this option you will be prompted to select a profile before you start Outlook.
Outlook Configuration
Note: Do not choose a manual setup as it was used to do at earlier Outlook versions.
After you have entered data required for the configuration, click Next >.
 Log in entering your primary email address and associated password.
To prevent further password prompts, mark Save credentials checkbox.
Note: If your computer is in Active Directory, the credentials of the logged in account will be entered automatically, these may be modified if necessary.
After successful completion of the configuration, three green check marks appear.
 Click the Finish to complete the process.
By activating the Change account settings checkbox, you can make additional settings for your Exchange mailbox, like disable data encryption between Outlook and Exchange, require password prompt every time you log or adjust Exchange Cache Mode.
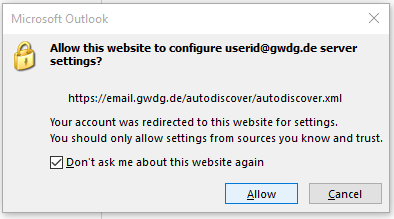
Autodiscover Dialog
After the Outlook start, normally you receive an Autodiscover dialog.
 or
or
 This dialog does not have to appear immediately; it can be repeated several times.
. Click the Don’t ask me about this web check box, and then click Allow. However if adjustments at the Exchange server are made, the dialog will reappear.
Automatic configuration via Autodiscover fails
If the automatic configuration of Outlook 2016 does not work, try the following solution:
1. Verify user name and password
First, check your e-mail address and password. You can check this through the GWDG-Portal by going to the login page at the top right, or alternatively you can make a login attempt through the Outlook Web App .
2. Manually configure Windows credentials
In case the Exchange Server can not verify logon information automatically. This may occur at Windows machines, which e.g. are not in the Active Directory or there are generally limited network settings at your institute. The Windows logon information for the Exchange server should be entered manually. Open Control Panel → User Accounts and Family Safety → User Accounts. Click on the Manage Credentials. Click on Add a Windows credential and save following logon information for your Outlook connection:
| Internet or network address: | email.gwdg.de |
| Username: | Primary email adress |
| Password: | Your GWDG passwort |
After this step is done run the Outlook Configuration again.