Table of Contents
Print Server
This article describes how to connect a Windows 10 PC to a printer queue provided by the GWDG via gwdg-print3.gwdg.de. gwdg-print3 is a server with Windows 2019 as its operating system. We recommend gwdg-print3 to users who are setting up a GWDG printer queue for the first time (e.g. on a new PC). If you have already set up GWDG printer queues using the old gwdg-print, there will be no change for you because these old printer queues will continue to work.
If you would like to set up a printer which is located in your office or institute, please have a look at Centrally managed institution printers
Attention: Based on the PrintNightMare vulnerability, Microsoft has distributed several updates in recent weeks to close the vulnerability. Unfortunately, this led to several other issues related to printing over the network. To our knowledge, printing via the print servers GWD-Winprint and GWDG-Print3 is possible for systems within the Active Directory. Prerequisite is an updated operating system. Systems not running in Active Directory still have problems printing via the mentioned print servers. Various workflows published on the Internet for solving the problems are on the one hand associated with a reduction in security and on the other hand are not equally helpful in all cases. We are working at full speed to solve the problem.
Ausdrucken über den Windows-Terminalserver wints1.top.gwdg.de
Printinig via Windows-Terminalserver wints1.top.gwdg.de has the advantage that you do not need to install any additional printer drivers on your PC.
Log in via RDP with your GWDG account on wints1.top.gwdg.de. When you are logged in,
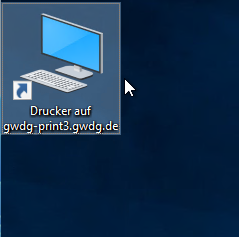
please double click with the left mouse button on the symbol “Drucker auf gwdg-print3.gwdg.de”
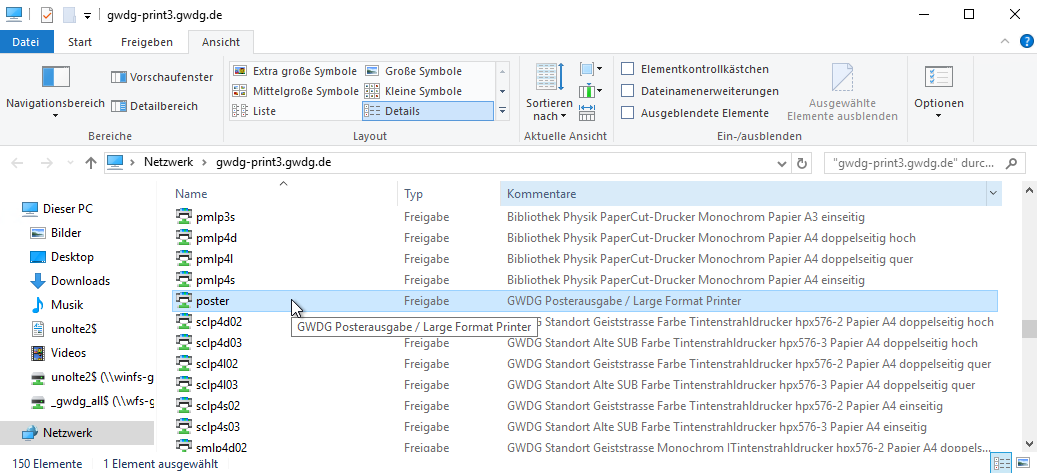
Now you get a list of printers released by gwdg-print3. If you display the details in the explorer window
Details window, you will see more information (e.g. location, paper size, etc.) about the printer.
If you double click on a printer with the left mouse button, it will be connected immediately (in our example it is the poster printer in the computer center at Burckhardtweg 4)
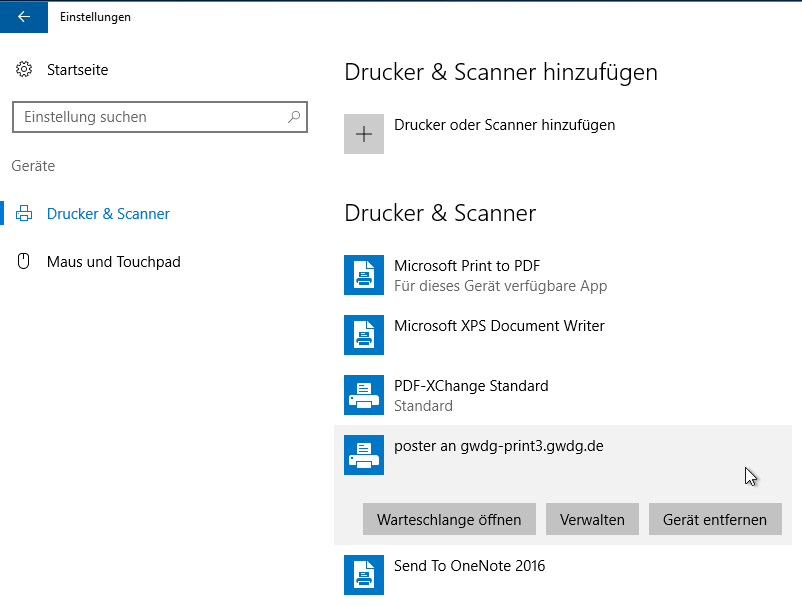
In the settings, under “Printer & Scanner”, you can make sure that the printer has been added.
You can now use the printer.
Howto install a GWDG printer queue on a Windows 10 Computer in GWDG's Active Directory
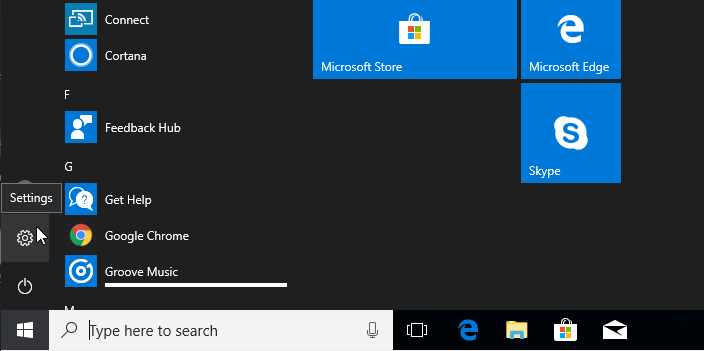
Click on the Windows logo in the bottom left corner to open the Start menu. Then click on the small “gear” to get to the settings.
Now click on “Devices”

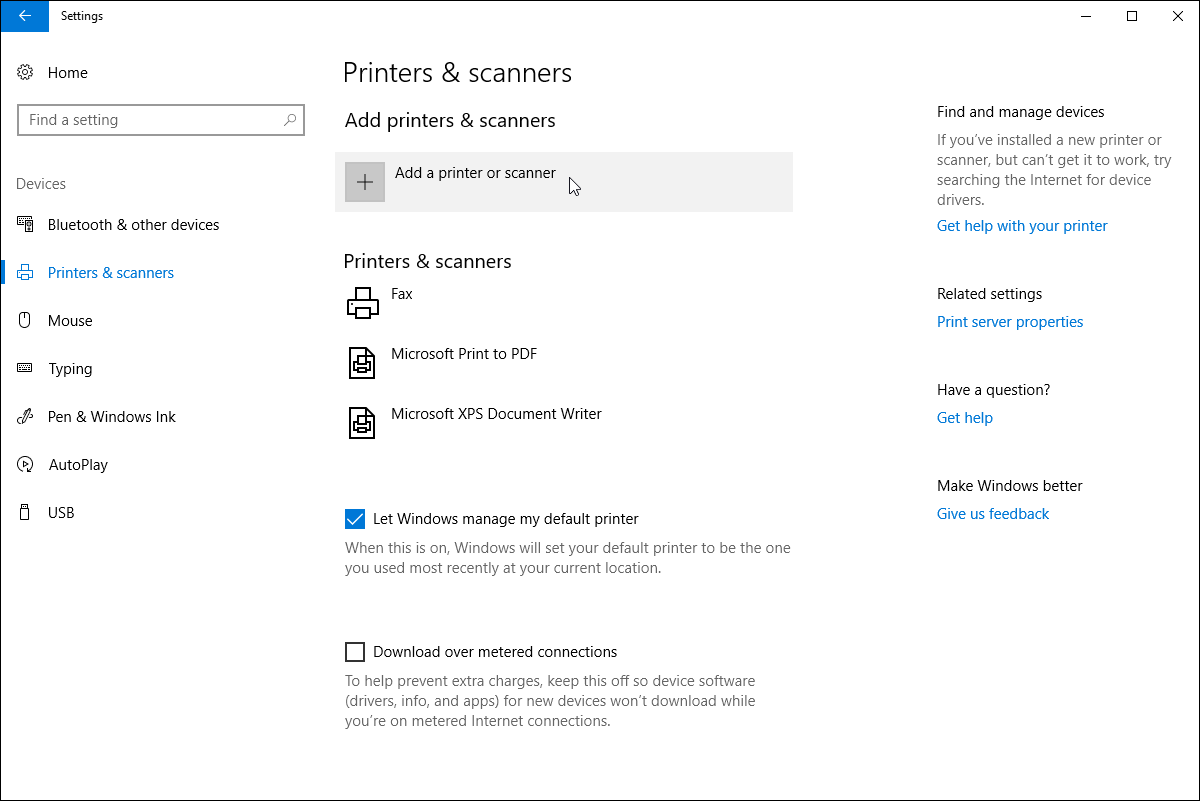
and next on “Printers and scanners” in the left column.

Click on “Add a printer or scanner”.
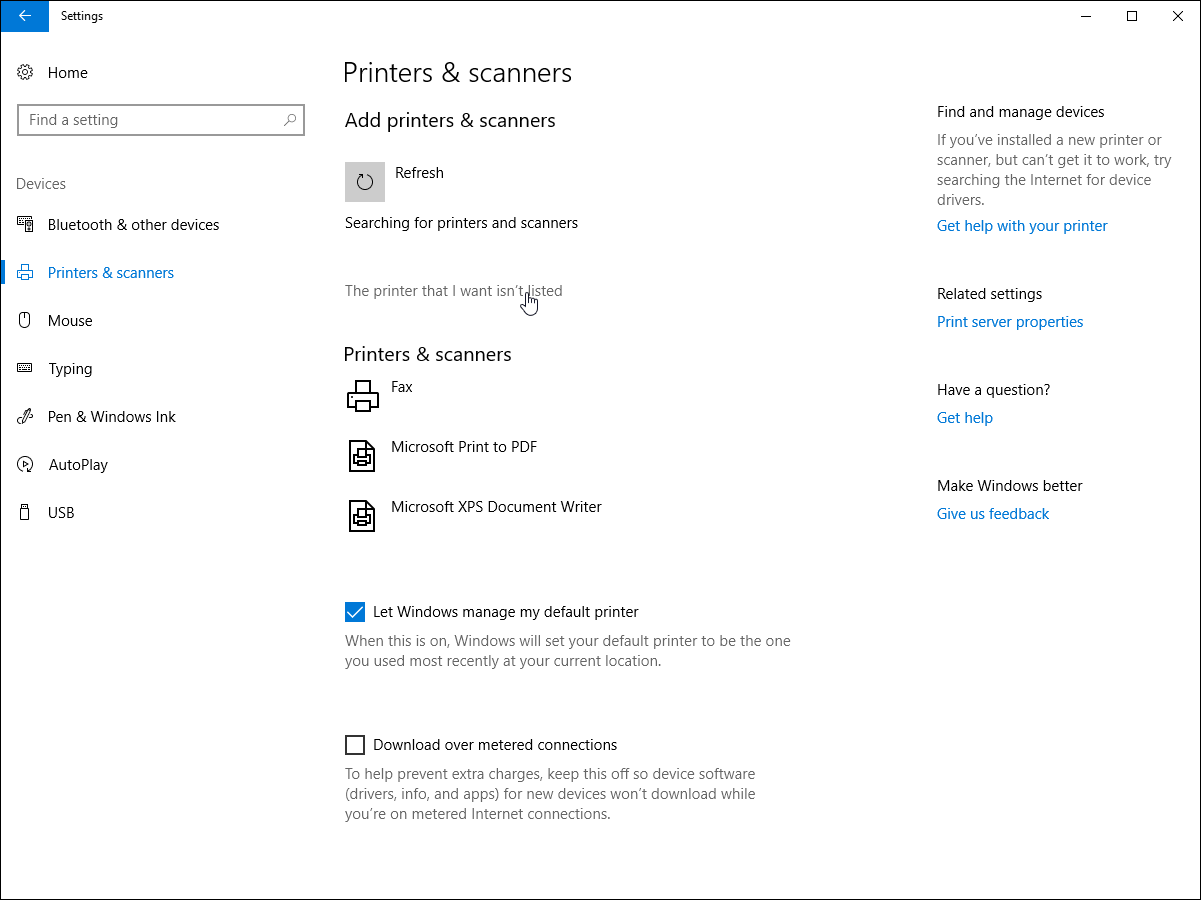
Now, Windows is looking for new printers. But this won't be successfull here. So click on “The printer that I want isn't listed”.
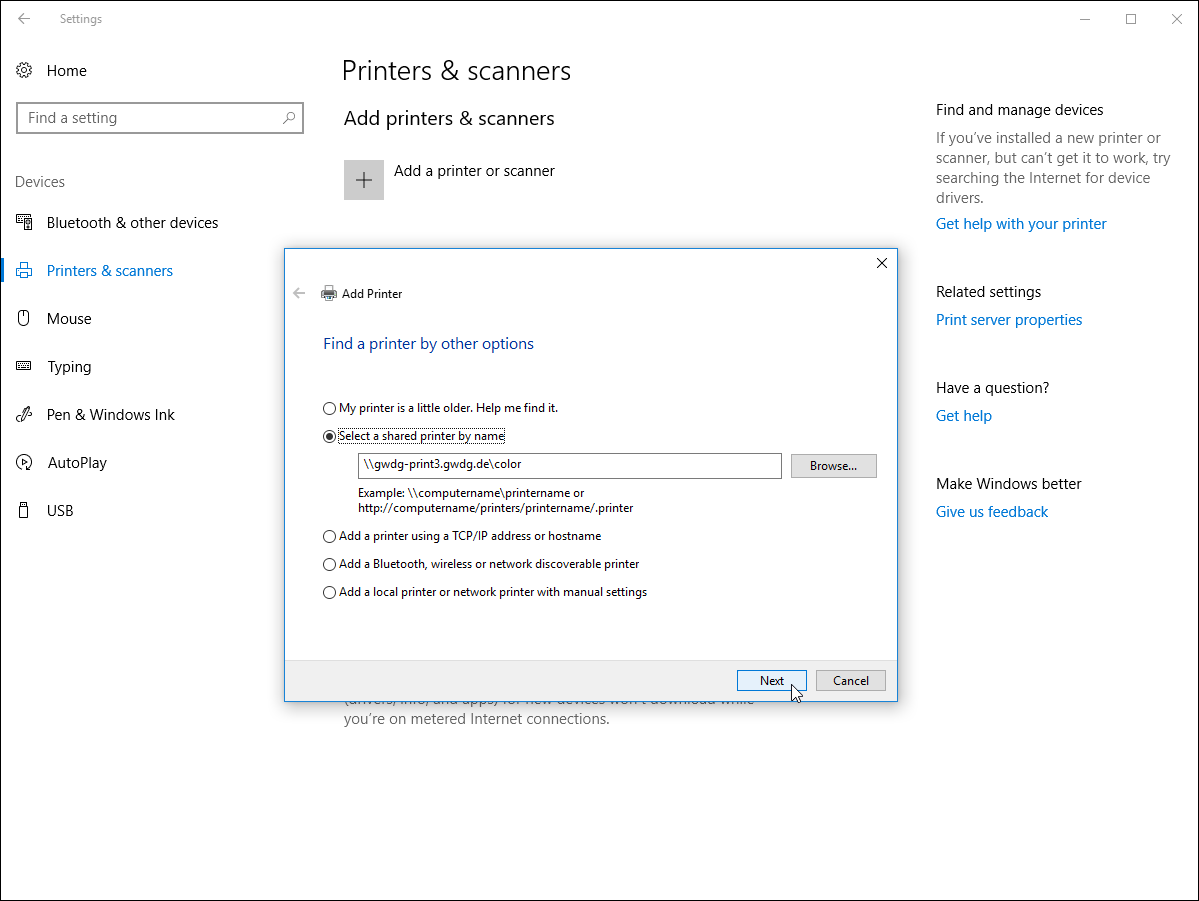
In the next step, Windows offers you to “Find a printer by other options”. Choose “Select a shared printer by name”. As an example we want to add a printer called “color” on gwdg-print3. So please enter
\\gwdg-print3.gwdg.de\color
in the text field and click on “Next”.
Windows is downloading the printerdriver from gwdg-print3 now. When this ist done, click on “Next”
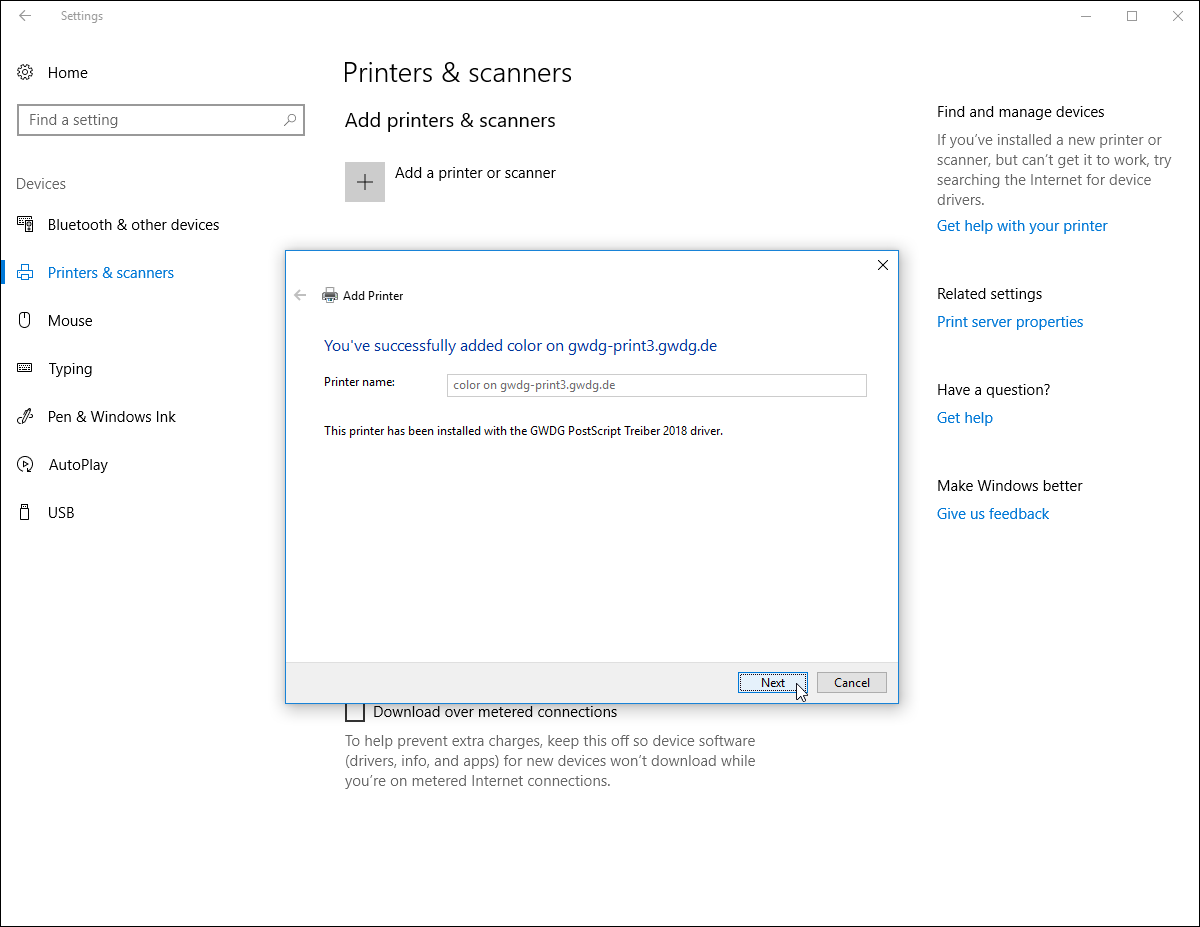
You can now print a testpage if you want. In the next step click on “Finish”.

Now you can see new printer as “color on gwdg-print3.gwdg.de”.
When the printer setup is done, it is a good idea to check which printer is the default printer now. Windows very often sets a new printer as the default printer. That's not always what you want. So it is a good idea to uncheck the box labled “Let Windows manage my default printer”,
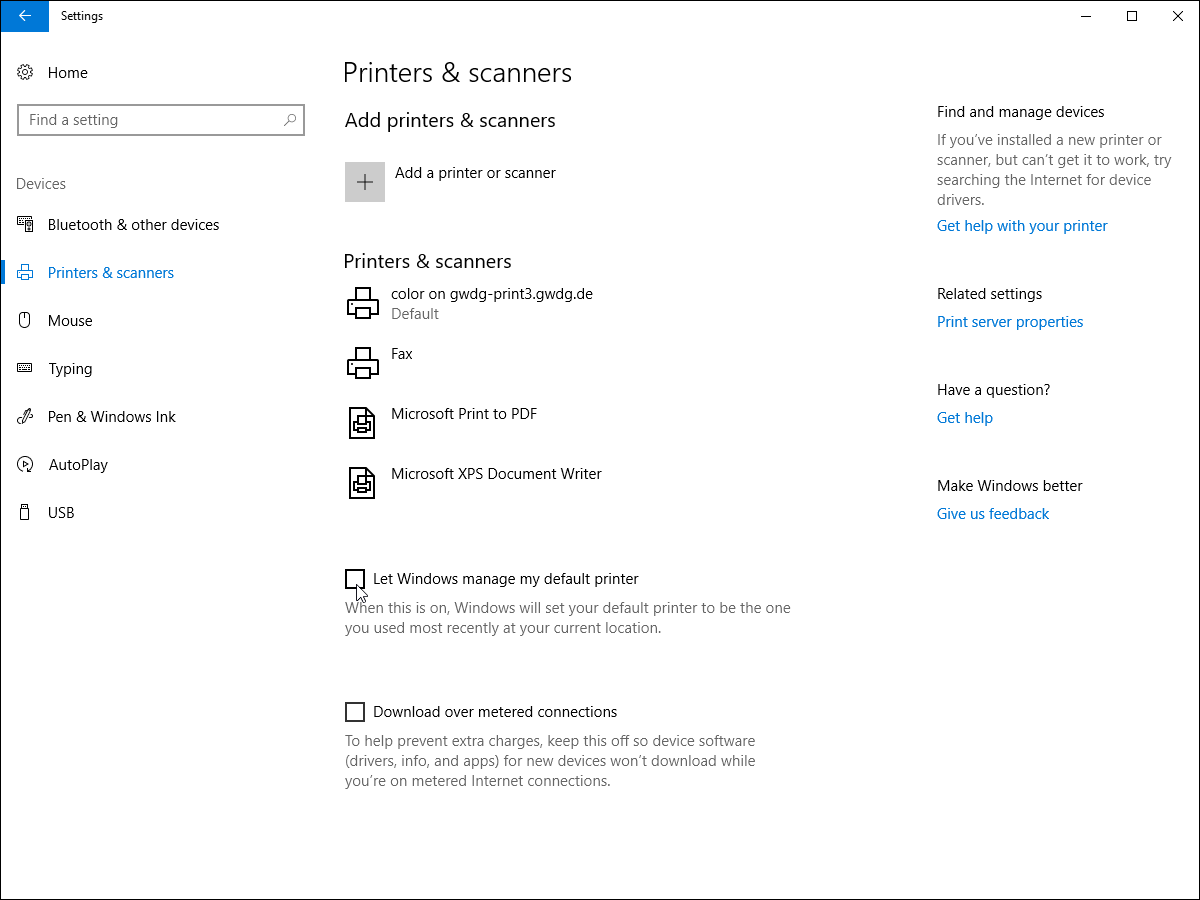
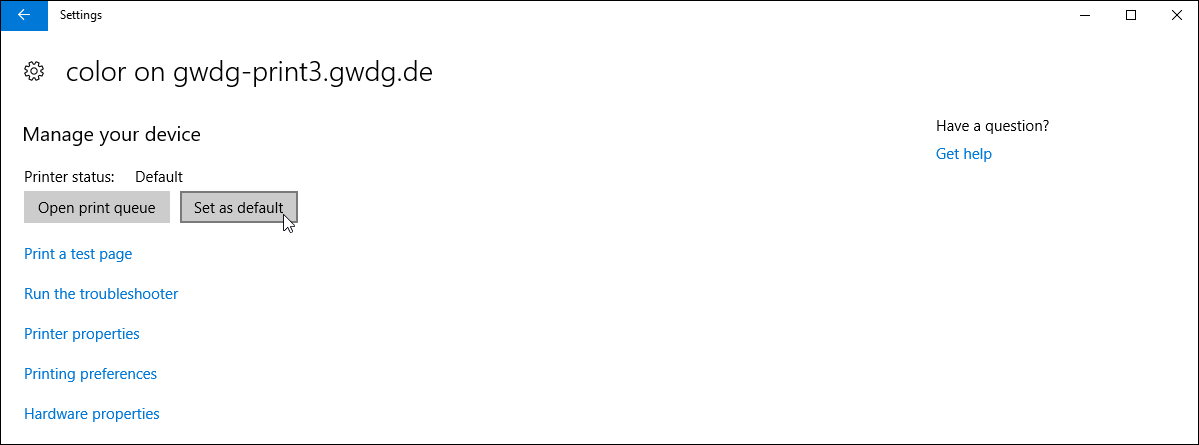
Select the printer that you want as your default printer, click on “Manage”

and then on “Set as default”.
Howto install a GWDG printer queue on a Windows 10 Computer that is not in GWDG's Active Directory
The procedure is generally the same as described above.
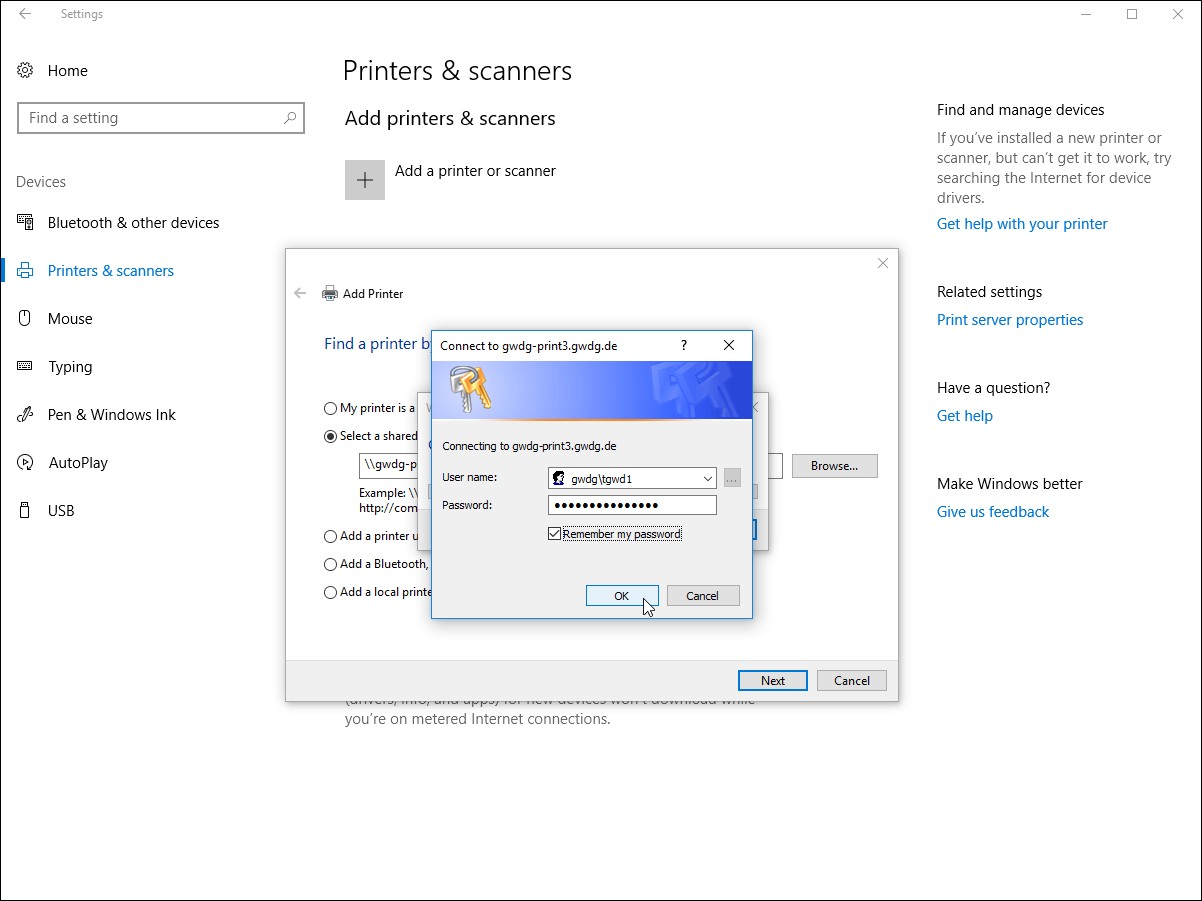
If your computer is not a member of our Active Directory, Windows will ask for your user name and password when you try to connect to the print server. Enter gwdg\<YOUR_GWDG_ACCOUNT> as user name (e.g.: gwdg\tgwd1) and your password. Klick on “Remember my password”. Otherwise the printer you have just installed will not work after your next login.
Troubleshooting
Printjob to large
Our printserver uses the so called Line Printer Daemon Protocol to transmit print jobs. Internally, the size of a print job is stored as a 32-bit integer variable. With 32 bit integer you can only “count” up to 2GB. Larger print jobs might block the queue or produce an empty page. The only thing that helps is to delete the print job and reprint it in a lower resolution or split it into seperate documents.
My printer is not shown
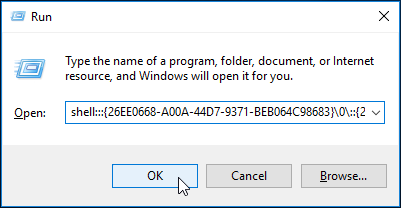
Sometimes Windows 10 does not show all the installed printers on your PC. In this case press the winows key and “R” at the same time to run a command. Enter
shell:::{26EE0668-A00A-44D7-9371-BEB064C98683}\0\::{2227A280-3AEA-1069-A2DE-08002B30309D}
and click on “OK” and restart your PC if necessary.
Special large format printer queues
In contrast to all other queues, the queues zcixls61, zcixls61, bcixls79, gcixls13, mcixls79 and pcixls13 are not equipped with the GWDGPS driver. There the “HP DesignJet Universal Print Driver PS3(v5.9.0)” is used. This driver offers more setting options and is therefore only intended for experienced users.
This driver offers a variety of predefined page formats in its print settings under Paper/Quality → Paper Options → Document Format → Other… (including B4 (ISO) to B0 (ISO), the US architect format Arch A to Arch E, JIS B4 to B0). You can also define your own page formats.
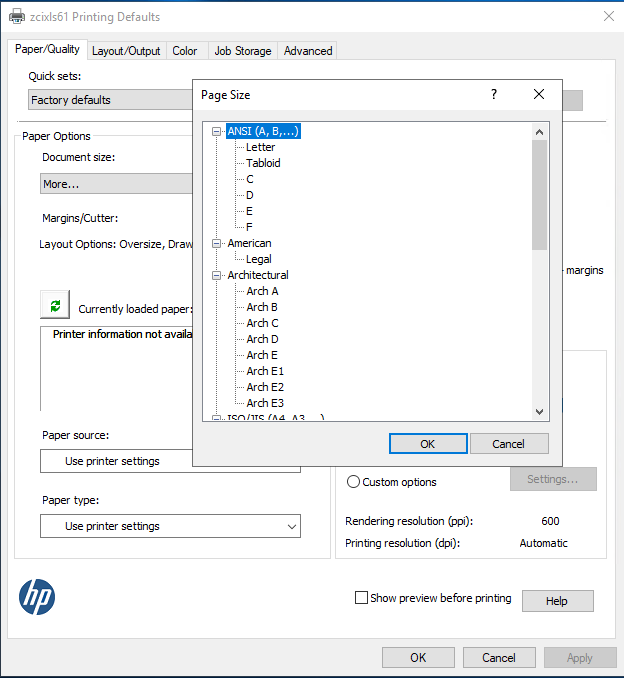
In the following, the queue zcixls61 is used to show how to define your own paper size (in this example 700×1000 mm). First connect the printer \\gwdg-print3.gwdg.de\zcixls61 and then have a look at the print settings.
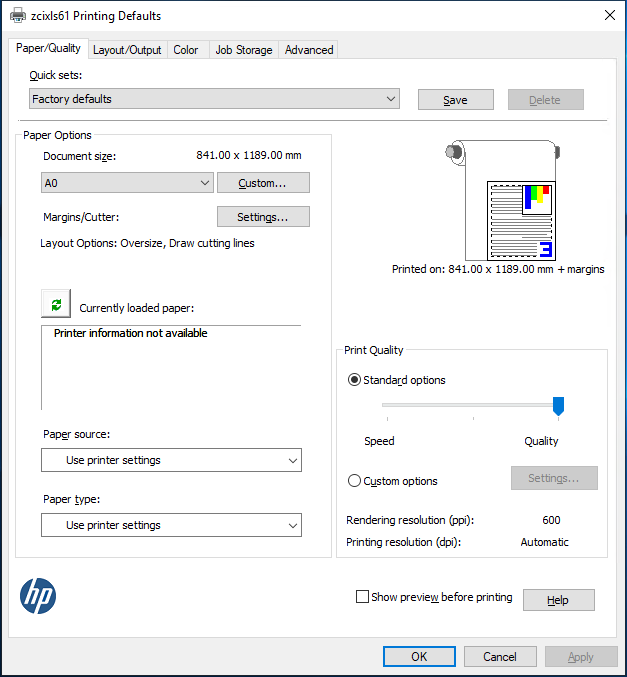 First of all, please check whether your print settings correspond to those in the above screenshot and adjust them if necessary. It is very important that “Use printer settings” is selected for “Paper source” and “Paper type”. The “Quick sets” should be set to “Factory defaults”. In the next step under “Document Format”, click on “Custom…” to create a new paper size.
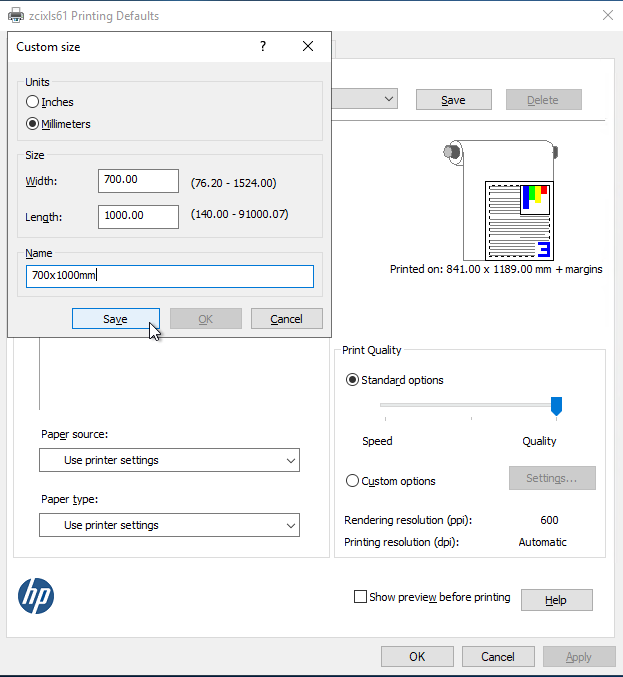 Select millimeters as the unit of measurement and enter 700 for width and 1000 for height under “Format”. Please note that new paper formats must always be created in portrait format. This also applies if you want to print in landscape format. The page format must not be wider than 1060 mm (even if the above window says otherwise). The paper roll used is only 42 inches wide (corresponding to 1067 mm), from which 7 mm of unprintable margin must be subtracted. Now give your paper format a meaningful name (e.g. 700x1000mm). When you are finished, click “Save” and then “OK” to return to the print settings.
If you click on “Paper Options → Margins/Cutter: → Settings…”, you can determine how the print margins should be handled.
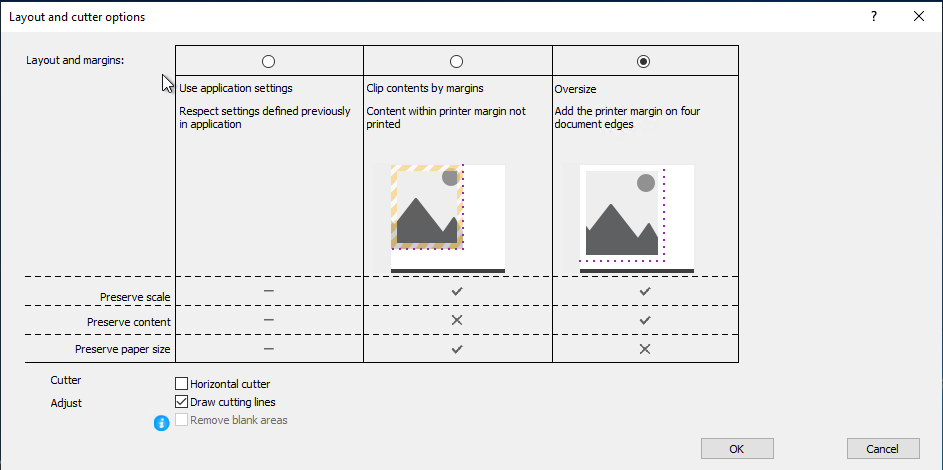
We recommend that you select “Oversize” as the “Margin arrangement”. This means that your printout will really be 700 x 1000 mm. At “Adjust” please activate “Draw cutting lines”. Then a thin, dashed frame is drawn around the image. This frame will be helpful when cutting the image (especially for posters with white background). Then click on “OK”.
Now the print settings will show “Printed on 700.00 x 1000.00 mm + margins”.
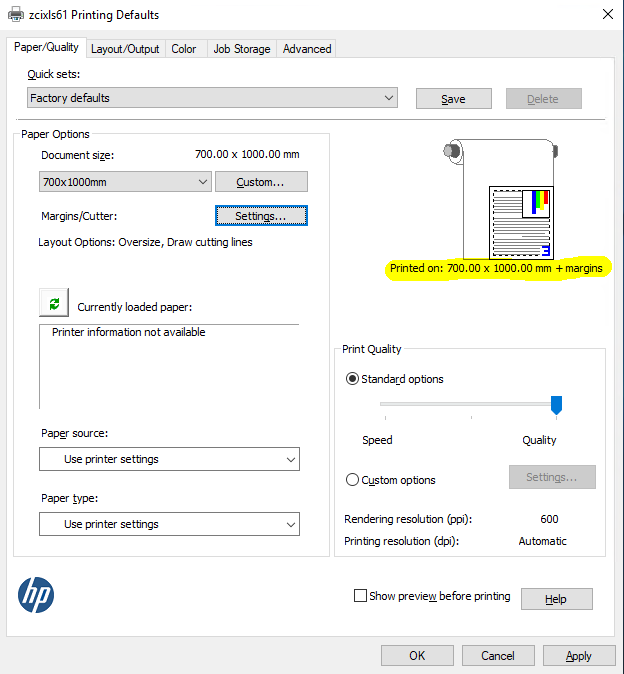 Click on “OK” or “Apply” to apply these settings.
Troubleshooting
As a result of the PrintNightMare bug, it may happen that a GWDG printer cannot be installed in the way described above. Sometimes the following workaround helps:
- Download the GWDGPS-printer-driver here.
- Unzip the zip file, search there for the file GWDGPS_2018.inf and install it by right clicking.
- Enter e.g. for the printer color the following share name: http://gwdg-print3.gwdg.de/printers/color/.printer
- Select as printer driver the GWDGPS printer driver installed under 1.
- VERY IMPORTANT: when installing the printer via http, no default settings (e.g. A0 for poster printers) will be taken over. Therefore please check the settings before sending a print job!
