Table of Contents
Virtual Server
Overview of VMware-related services offered by GWDG
The GWDG is hosting a VMware vSphere environment based on vSphere ESXi 5.5 which is available for all GWDG customers. A GWDG account is required to apply for a server and for accessing the console.
Infrastructure
The VMware cluster at GWDG has a VMware designed HA functionality.
If a VMware host is down the failover will restart all runing VMs of that host on another host.
The cluster is build at two locations within Göttingen and it is for productiv VMs location redundant. Which means that some of the VMs can be run at the second location even if the first location is failing. For VMs with the need of extra high availability ressources can be held at both locations.
As mass storage a NFS mirrored at both locations is used. Furthermore the use of other mass storage types offered by the GWDG (e.g. StorNext and SAN) is possible.
Services
Using the vSphere Web Client at the terminal server of the GWDG (vcenter.rds.gwdg.de) you are able to access you VM globally 24/7.
The GWDG is giving extensive privileges for the VM managemant:
- Reboot, power on, power off, …
- Creating and deleting snapshots
- Switch to specific snapshots
- Access to a console
- Mount ISO images from your own computer
- Activate and deactivate the network interfaces
- Create, modify and execute schedueled tasks
- Modify descriptions and attributes of the VM
Most other options of an enterprise VMWare environment can be requested in a ticket. Simply send your request to support@gwdg.de:
- Adjust hardware configurations - CPU Cores, RAM, mass storage, additional network interfaces and so on…
- Creating a clone for test cases
- Other special requierments can be can be fullfilled in coordination with the GWDG
Your requests are processed during the operating hours of GWDG
Monday - Friday ⇒ 7:00AM - 9:00PM
Saturday & Sunday ⇒ 10:00AM - 6:00PM
The GWDG will process your request as fast as possible.
Quick Guide: 5 Steps to create a VM
- Create a concept of needs for the VM. This concept should cover the points size (RAM, CPU cores, internal mass storage), security (vLAN, firewall rules), operating (operating system, administrators) and if necessary additional external storage.
\\Whats my institute's abbreviation?
Your institute's abbreviation can be found at the GWDG Portal at www.gwdg.de.
My Account → Account → Institute - Use the corresponding SharePoint form to apply for a VM. Therefore you should enter the points of the concept into the form.
- Once your VM is deployed, you will receive details to it such as the IP address in an e-mail.
- Access the terminal server of the GWDG (vcenter.rds.gwdg.de) via RDP and open the vSphere Web Client in any browser to manage your VM.
- You can select your VM and start a console session within the vSphere Web Client. Here you can install the operating system.
A VM application from users of the University of Göttingen is deployed automatically if following configurations are not exceeded:
Max. CPU 2 Cores
Max. RAM 4 GB
Max. internal mass storage 100 GB
Exceeding these configurations will result in a manually deployment which will extend the time till the deployment.
IMPORTANT: Please ensure that the account you are using is credited to the institute you are applying the VM!
I need a larger amount of storage (> 512 GB) and/or i already have a large quantity on one of GWDGs fileservers that i want to access- what services do you offer for me?
GWDG offers two possible ways to access external storage from within your VM:
a. Blockdevice (you manage your own filesystem)
b. Managed Filesystem over high-level protocols
Please inquire in advance on these solutions before applying for the VM.
Applying for a virtual server
To apply for a virtual server, please visit this SharePoint Document.
Here you can open the application form by clicking Server Beantragen and Neues Element. (A login using your GWDG credentials may be necessary) Please fill out the form and click on “Speichern” to save.
You need to log in with a GWDG-Account or an account authenticable to the AD of the GWDG at the location
Göttingen.
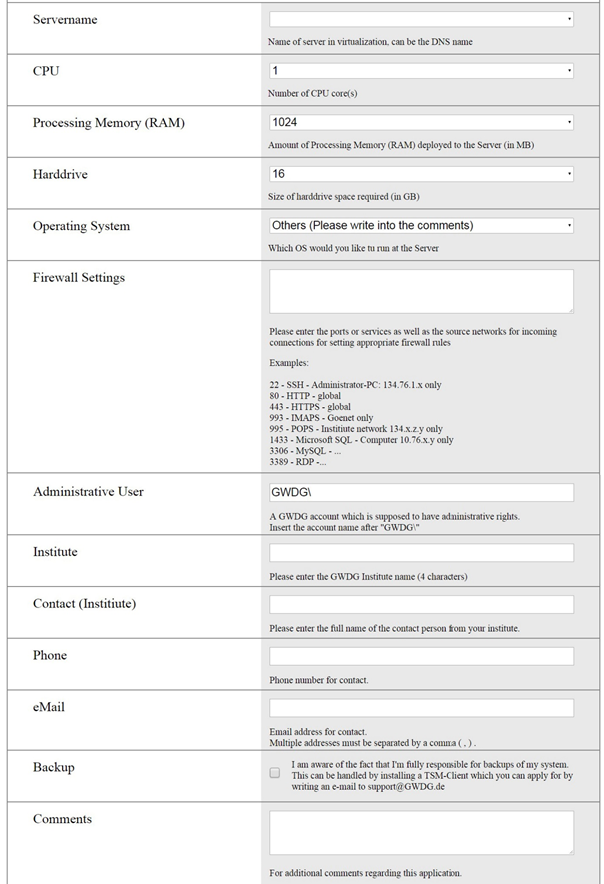
The form is only available in german. You can use the image above as translation.
Managing VMs
To manage your virtual machine you have to log in at the Windows Terminal Server of the
GWDG via remote desktop protocol (RDP). Using a RDP-client, in Windows this would be mstsc.exe, in
Linux it would be the rdesktop for Apples Mac you can use the Remote Desktop Connection Client of Microsoft or similar RDP cLients. Please ensure in all cases you have installed the latest clientversion.
As DNS-name use vcenter.rds.gwdg.de to connect to the terminal server.

To manage your vServer, you may the desktop shortcut within the terminal server.
vSphere Web Client
| Open the shortcut on the desktop. If the background color of the website is blue you can skip the next step. | 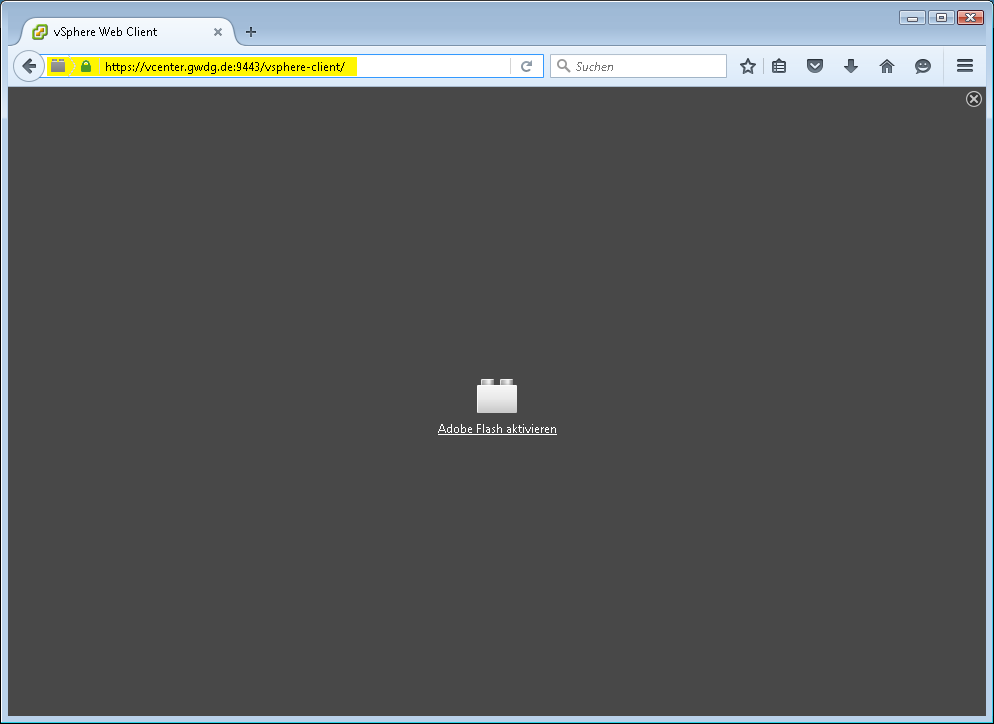 |
| If the background color of the website is gray you may need to enable the plugins. You can do this by clicking on the brick symbol within the address bar. By selecting the button “Erlauben und Entscheidung merken” you will allow this website to use the plugins permanently. The website should reload automaticaly, otherwise you can trigger the reload manually by pressing the “F5” key. | 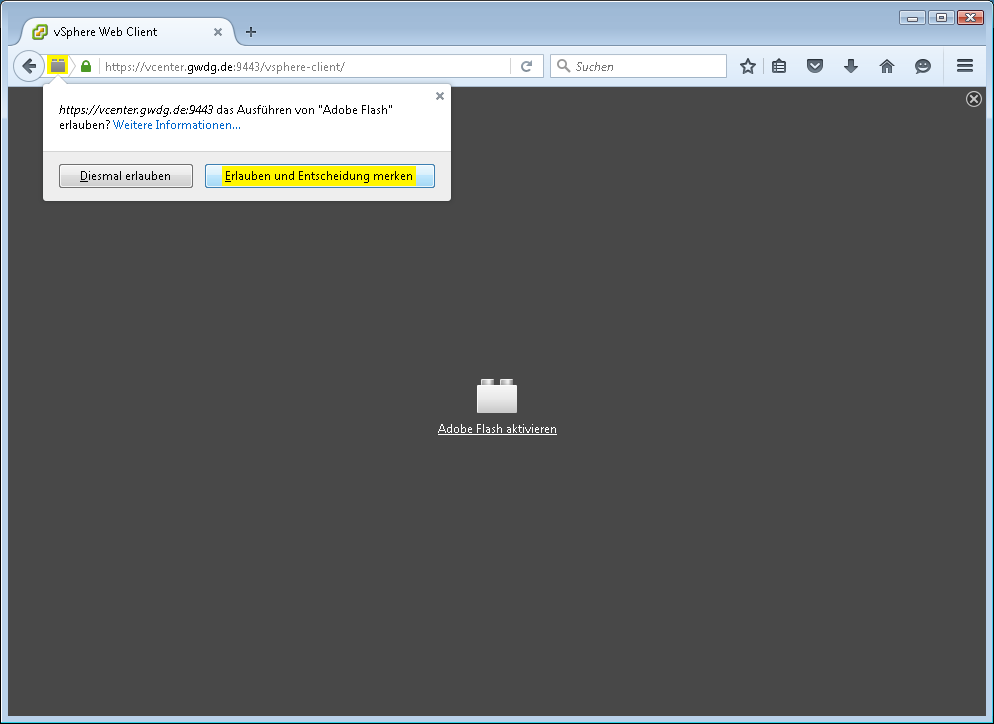 |
| A website with a blue background should appear. Instead of entering a username and password, simply tick the box “Windows-Sitzungsauthentifizierung verwenden”. As an alternative you may enter the credentials of that GWDG account, which has been entered earlier in the application form (incl. prefix: GWDG\userid). | 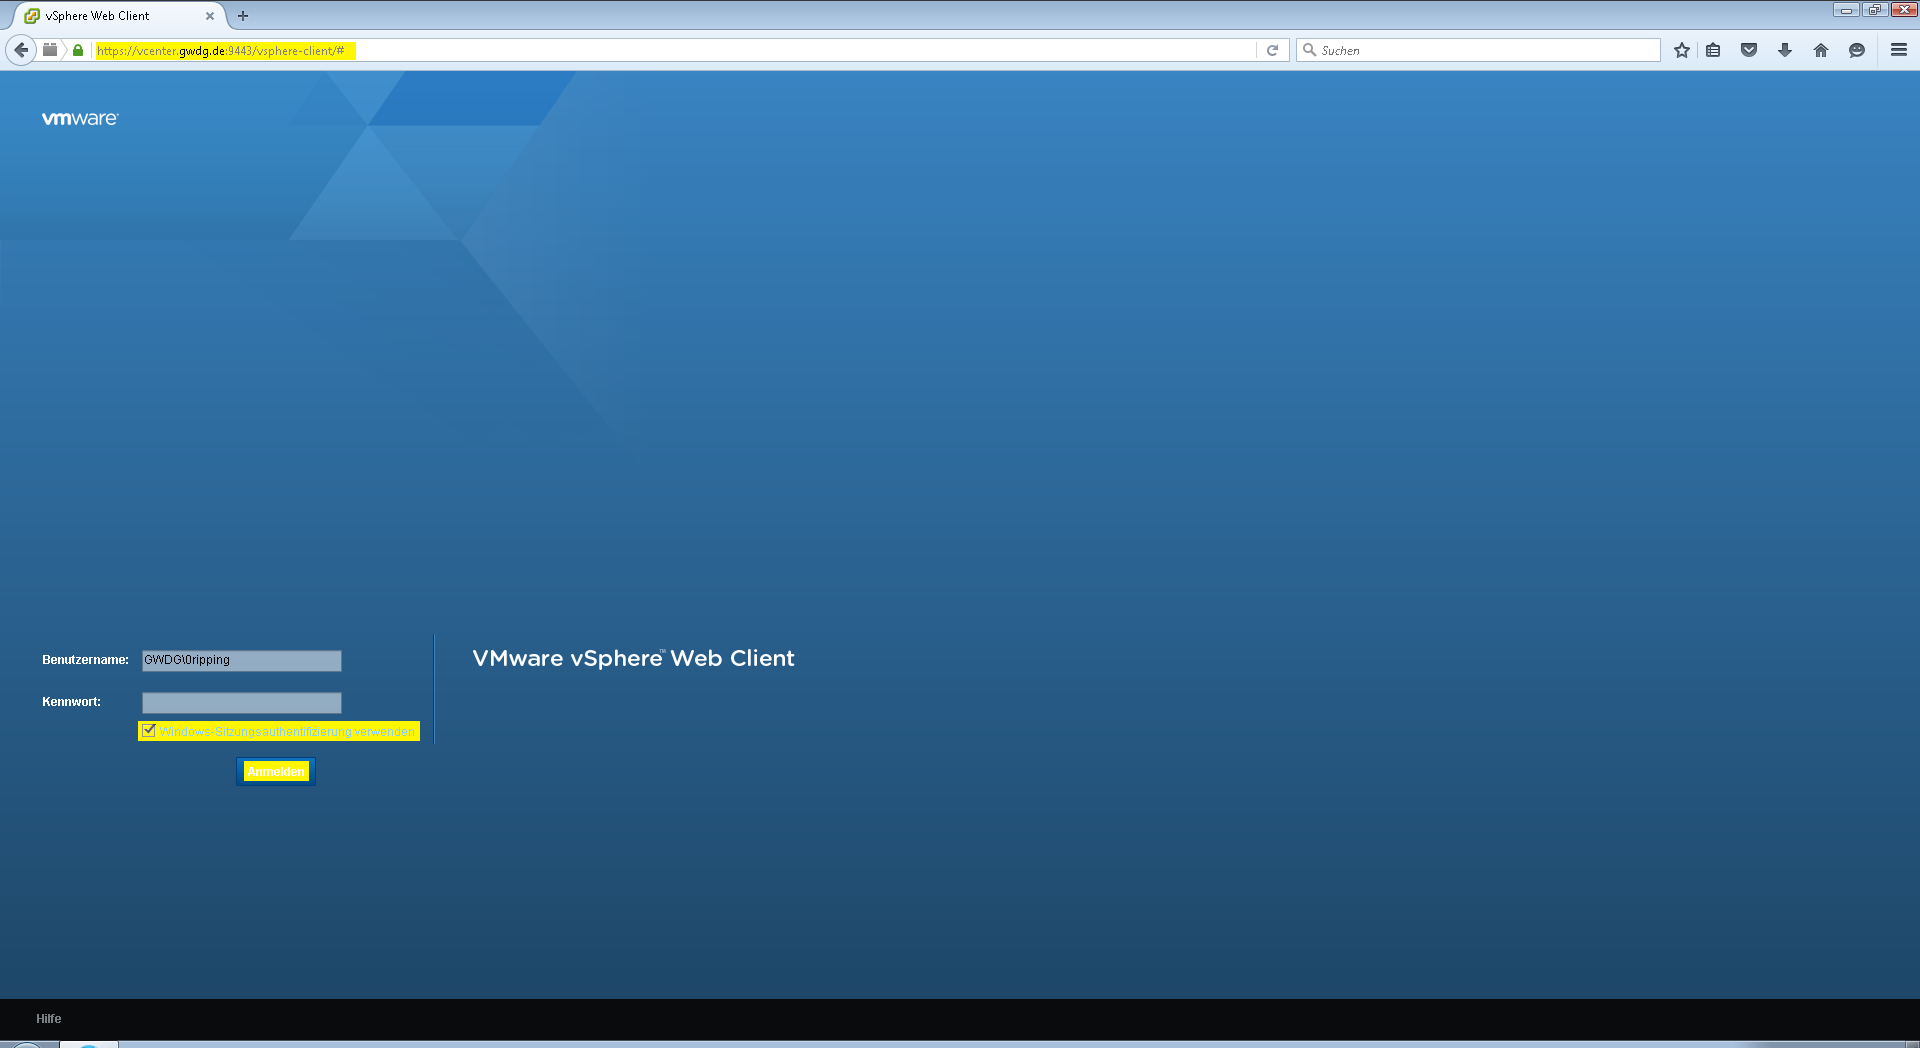 |
| The shown massage may appear during the authentication process. Please assure that the tick next to “Always ask before allowing this site” is removed before hitting the “Allow” button. |  |
| When logged in, you may choose VMs and Templates where your VMs will be listed on the left side. | 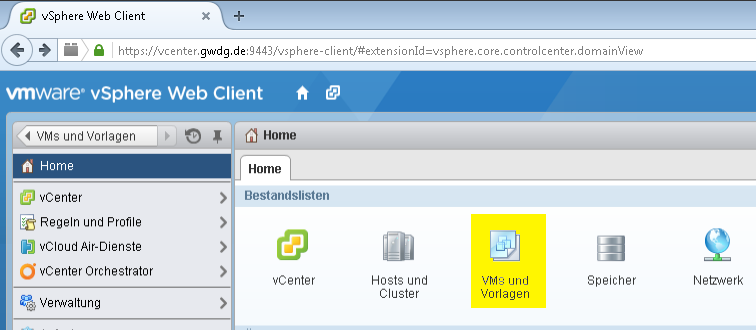 |
Operating System Installation
Please find a list of all supported Operating Systems and how to install them under http://partnerweb.vmware.com/GOSIG/home.html
Assigning DNS Names To Your VMs
After you have installed and configured your server via console access and already got the IP, your network administrator will be able to add an appropriated record into the IPAM.
Deleting / Removing a VM
If you want or need to remove/delete your VM, please send an e-mail to support@gwdg.de containing the name of the VM and your contact data.
VMware Tools
Setup Guide For The Installation Of VMware-Tools
To install VMware-Tools on Linux there are three possible procedures.
- Installing the native Tools via VMware vSphere (Web)Client (For details please see http://kb.vmware.com/selfservice/microsites/search.do?language=en_US&cmd=displayKC&externalId=1014294).
- Installing VMware Tools using a packet manager and a VMware repository (Details: http://www.vmware.com/download/packages.html).
- Installing OpenVMware-Tools from other sources: Using a packet manager or download as zip- or git-file from https://github.com/vmware/open-vm-tools#general.
In Windows only the first option is available.
Install VMware Tools From vSphere (Web) Client
If you want to install the VMware Tools at your guest operating system using either the vSpehre Client or the vSphere Web Client, you have to assure the the VM is powered on.
The steps within the vSphere descriped below will only mount an image of VMwware Tools to your guest operating system. Within your system you can install the VMware Tools as you would install software from a CD.
vSphere Web Client
 Select your VM by a right click on it. A context menu appears where “All vCenter Actions” should be selected. Within the sub menu of “All vCenter Actions” you can select “Guest OS” to get in another sub menu. Here you can select “Install VMware Tools…” to mount the Image.
VMware Snapshots
Snapshot concept
- A Snapshot isn't a backup and doesn't replace such. If you need a system state which you want to access later (e.g. after initial installation of the operating system) please configure TSM backup, use a suitable tool to create an image or create a system internal backup.
- VM Snapshots will be deleted after 7 days. This will happen without any notification upfront.
- Snapshots may use the entire size of the system, depending on time and the numbers of changes made within the system, which means that a 1TB VM may use up to 2TB of storage!
Creating Snapshots
- Use vSphere Webclient to create or delete Snapshots. All registered administrators have these permissions.
- Please include the date of creation within the name of the Snapshot. This will make it easier to overview the age of the snapshot.
Deleting Snapshots
Users may delete snapshots again as well, otherwise they will be deleted after a 7 day period without any notifications ahead. If you need a snapshot for a longer period of time, please contact the VMware team from GWDG at support@gwdg.de.
Include own ISO Files
Include ISO using the WebClient
| Please select your VM and select the tab Erste Schritte. Within the pannel VM-Hardware you can find the link Einstellungen der virteullen Maschine bearbeiten. |  |
| Select the tab Virtuelle Hardware in the pop up window. |  |
| On the left side you can find a list of the virtual hardware, focus the label CD-/DVD-Laufwerk 1 (or similar). Choose Clientgerät in the corresponding dropdown menu appearing on the right side. Confirm your option selection by clicking the OK button. |  |
| Now you can select your VM and approve that it is switched on. |  |
| Select the Übersicht tab and view the VM Hardware panel. Here you can find a CD Icon labeled CD/DVD-Laufwerk 1 (or similar). You can find an icon (Representing two plugs) at the same line on the very right of the panel having a downwards arrow aside. You can open the context menu by clicking on the plugs icon. |  |
| Please select Mit dem CD/DVD-Image auf lok. Platte verbinden… from this menu. In the window which shows up, you can browse your local files and select the image you need. |  |
| The image is now included and should show up in your VM in no time. |  |
| To install an operating system you have to enter the BIOS to change the boot prioritys. Therefore you need to open the VM settings again. Choose the tab VM-Optionen and focus the menu point Startoptionen. A point BIOS-Setup erzwingen will appear beneath. You can find a chekbox just to the right of that point. Please check that box and save the settings using the OK-Button. |  |
| Switch off your VM. Starting it again will take you to the BIOS setup. You need to navigate (navigation keys are shown at the very bottom of the image) to the point Boot using the right arrow key. You can use the down arrow key to go to the CD-Rom drive. Move that point to the top of the list bei using the +-Key multiple times. By pressing F10 the settings are beeing saved and the VM is restarting and boots, if possible, from the disc / image. During the installation you should enable the BIOS-Setup erzwingen option again. Once the installation is done, your VM will boot again into the BIOS setup. Go to the Boot tab again and choose +Hard Drive to be at the top of the list. If everything is done right, your VM should boot into the operating system now. |  |
Connecting a NIC
If your VM's NIc isn't connected, please follow these steps:
WebClient:
| Edit settings |  |
| Select the NIC, then tick “Verbinden” (If the VM is powered on) and “Beim Anschalten verbinden” to ensure the NIc is connected after restart |  |