This is an old revision of the document!
Table of Contents
Setup of a VPN Connection
General Information
You can find general information about VPN connections here
The GWDG strongly recommends using the Cisco AnyConnect VPN.
For macOS 10.6 and later, it is possible to use the VPN with on-board software and without installing an additional client (see below). Attention: the alternative gateways vpn-b.gwdg.de and vpn-c.gwdg.de are not compatible with this method. To use these, you need to use Cisco Anyconnect.
Due to the current load in VPN, two more servers were set up in addition to vpn.gwdg.de: vpn-b.gwdg.de and vpn-c.gwdg.de . We recommend using one of them. This is only possible with the AnyConnect method , not by using the 'included client'.
Please make sure to switch to vpn.gwdg.de once in a while since updates will not be delivered while using vpn-b.gwdg.de or vpn-c.gwdg.de.
Connection via Cisco AnyConnect
Step-by-step image instruction: macOS (please click)


Should you encounter any issues during this process, please contact our support.
1. Connect to vpn.gwdg.de and use your credentials to log in. Your credentials are typically just your email address and the corresponding password.
Attention: Because of the current overload, it may not always be possible for you to connect to vpn.gwdg.de. You may alternatively download the client from our FTP server by using the following credentials: Username vpn; Passwort fernzugriff.
2. Click on AnyConnect within the navigation bar on the left.
3. Click on Start AnyConnect. If you do not have AnyConnect installed yet, you are asked to download the installation file. You may need to wait several seconds until the download starts.
4. Install AnyConnect from the file you have just downloaded. Please make sure that you are in possession of sufficient administration rights on your system or consult your system administrator.
5. Open the newly installed Cisco AnyConnect Secure Mobility Client to start the VPN.
6. Insert any gateway address (vpn-b.gwdg.de or vpn-c.gwdg.de or vpn.gwdg.de) and click on Connect.
7. Enter your credentials. These are usually your email address and the corresponding password.
8. Accept the terms and conditions for using the VPN.
You are now connected to the VPN.
If you want to start the VPN again, just start the client directly. It is not necessary to install the program again.
Due to the current load in VPN, two more servers were set up in addition to vpn.gwdg.de: vpn-b.gwdg.de and vpn-c.gwdg.de . We recommend using one of them.
The AnyConnect Client can also be downloaded from https://ftp.gwdg.de/anyconnect/
- Username: vpn
- Password: fernzugriff
Connect by using the integrated VPN Client
The GWDG strongly recommends using the Cisco AnyConnect VPN. Therefore, the use of the VPN solution integrated in macOS is not advised. click
Attention: This method is only compatible with vpn.gwdg.de and does not work with the alternative Gateways vpn-b.gwdg.de and vpn-c.gwdg.de
With Mac OS X Snow Leopard (10.6) or later, you can use the built-in VPN client directly.
1. Open System Preferences and click on “Network”. If the lock icon in the bottom left corner is still “closed”, click on it and enter your administrator password in the appearing window.
2. Click the plus icon to add a new connection.
3. Click “VPN” → “VPN Type” → “Cisco IPSec”.
4. For “Service Name”, you can enter a random name.
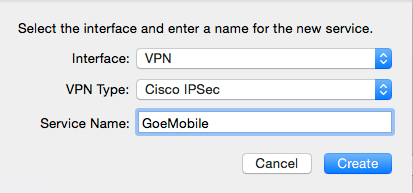
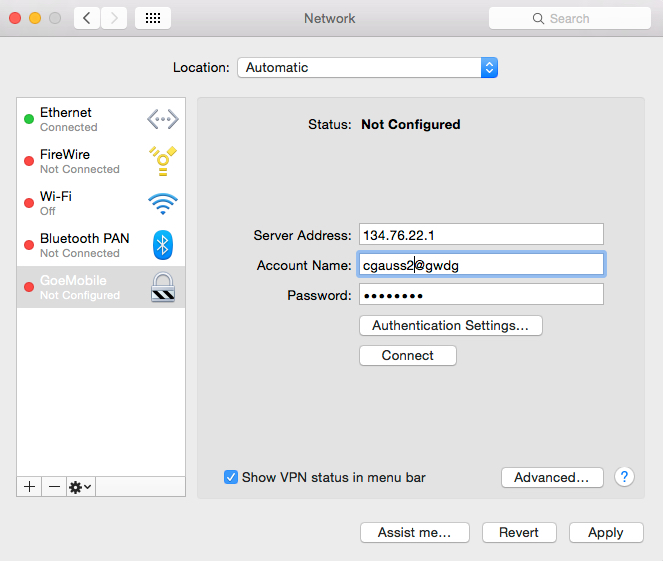
5. Click “Create”. You can now select the new connection and enter the server address: 134.76.22.1
For the “Account Name” enter your GWDG account. Employees use the extension “@gwdg”, while students use “@gwdg-stud”. Additionally, you should enable “Show VPN status in menu bar”.
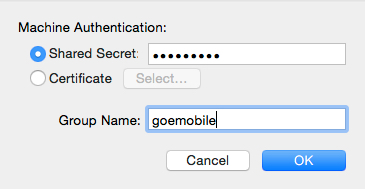
6. Now click on the button “Authentication Settings” and type “goemobile” as the key. As group name, use “goemobile” as well.
7. Now you can establish a VPN connection by clicking “Connect”.
8. If you have enabled the VPN status in the menu bar, you can always start and exit the VPN connection with GoeMobile by clicking on the corresponding icon.
9. For logging in to VPN, you must authenticate yourself. Students type their username as “firstname.lastname@gwdg-stud”, while GWDG accounts are entered as “username@gwdg”.
Be sure not to type “.de” at the end!