Table of Contents
Resource Mailboxes
Introduction
A resource mailbox is a special mailbox designed to be used to schedule and track events held in a single location such as a conference room or allocate equipment such as beamer or car to personnel. Resource mailboxes are associated with disabled Active Directory user accounts. Regular email items are not kept in this type of mailbox. There are two types of resource mailboxes:
- Room mailboxes (location specific resources such as conference rooms, auditoriums, etc.)
- Equipment mailboxes (not location specific resources such as beamers, cars, etc.)
In order to manage meeting requests, a resource mailbox can have delegates with various levels of control. However, it has no single owner. Both types of resource mailboxes can be included in meeting request, this provides a simple and efficient way for users to use resources. Resource mailboxes are configured to process incoming meeting requests based on defined resource booking policies. For example:
- a room mailbox can be configured to automatically accept incoming meeting requests from the director and other requests required a delegate’s approval, or
- a room mailbox can automatically accept meeting requests excepts recurring meeting requests that should be approved by resource delegate.
Requesting Resource Mailbox
To request a resource mailbox, send email to support@gwdg.de and specify the following:
- Type of the resource mailbox (room or equipment).
- The display name of the mailbox (long name). The name should be descriptive and use your institute abbreviation as a prefix. For example, “GWDG-T5-S1-067a Course Room”.
- [OPTIONAL] The short name of the mailbox. It should be descriptive too, for example, the mailbox above could be “GWDG-Room-S1-067a”.
- A list of the e-mail addresses (or aliases) of the resource.
- The administrator of the mailbox (i.e.,Director, IT Professional). The administrator will have a “Full Access” rights to resource mailbox.
- A list of Resource Delegates: the resource delegate is responsible of processing the meeting request for the resource mailbox. A resource delegate will have the following permission:
- Editor on the calendar folder of the resource mailbox;
- Editor on the “FreeBusy Data” system folder of the resource mailbox;
- “Send on behalf” of resource mailbox.
- A Booking list: specify the list of users who are allowed to send meeting requests to the resource mailbox. You should consider also that those users (booking list) will only see free/busy information for the resource mailbox. If you want the users to be able to view all the contents of the calendar, you have to mention this explicitly. There are different scheduling permissions, see the section “Resource Scheduling Permissions” below.
- In order to maintain the institutes separation and the consistency of the structure of address book, we also create for you the following:
- A resource distribution list
- A resource address list (separated lists for rooms and equipment)
- An address book policy
Configuration of Resource Mailboxes
Usually, resource mailbox configuration is done by GWDG Exchange administrators. However, the resource’s administrator, only in Outlook Web Access (OWA), can also modify and configure some settings.
How to configure your resource mailbox?
- You can access your resource mailbox in one of the following two ways:
- From within OWA (email.gwdg.de)
- Log in using your admin account, click the arrow next to your name in the upper-right corner of the page. You will see the Open Other Mailbox window.
- Type the alias (or display name) of your resource mailbox in the text area and click Open.
- You can go directly to your resource mailbox (e.g.; gwdg-room-999@um.gwdg.de) by entering: email.gwdg.de/gwdg-room-999@um.gwdg.de
- After the resource mailbox opens, click the Option button found toward the upper-right of the screen and then click on See All Options…
- Click Settings from the menu on the left, and then click on the Resource icon in the ribbon.
Resource Scheduling Options
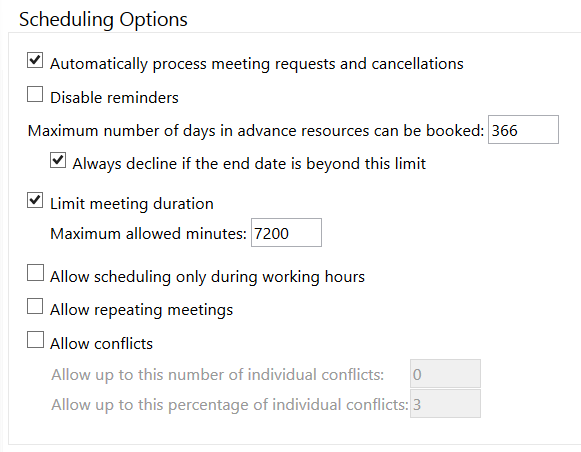
The first check box “Automatically process meeting requests and cancellations” is the entry point for the other scheduling options below. If you don’t check this box, none of the settings bellow will take effect.
- Disable Reminders – checking this box will turn off reminders for the resource mailbox. This option is probably a good idea, unless someone will be logging into the resource mailbox often to clear the reminders.
- Maximum number of days – sets the number of days the resource can be booked in advance.
- Always decline if end date is beyond this limit – if checked, requests trying to book the resource outside the maximum number of days setting will be automatically declined.
- Limit meeting duration – this option lets you turn on/off the Maximum allowed minutes option.
- Maximum allowed minutes – the time in minutes that a resource can be booked for.
- Allow scheduling only during working hours – if checked, booking will be only allowed during working hours defined in the Calendar Work Week section of the Calendar Options for the resource mailbox.
- Allow repeating meetings – check this option if you want to allow users to schedule recurring meetings for the resource.
- Allow conflicts – allows more than one event to be scheduled in the same time period. This settings and the following sub-settings should be set carefully when “Allow repeating meetings” is chosen. Conflicts occur when the proposed meeting time is already marked as Busy or Tentative on an attendee’s schedule.
- Allow to this number of individual conflicts – specifies the maximum number of conflicts allowed to be scheduled for the resource. If more than this number of attendees have conflicts, the resource will decline the meeting request.
- Allow up to this percentage of individual conflicts – sets the maximum percentage of schedule conflicts that are allowed by the resource. If more than this percentage of attendees have conflicts, the resource will decline the meeting.
Resource Scheduling Permissions
The Schedule Permissions settings allow you to control who can schedule the resource in which situation. There are three various scheduling situations:
- Users who can schedule automatically if the resource is available.
- Users who can submit a scheduling request that requires delegate’s approval if the resource is available.
- Users who can schedule automatically if the resource is available and submit a request for manual approval if the resource is unavailable.
Everyone: means all Exchange users (not only users of your institute) can schedule the resources. We don’t recommend this setting at all. Select users and groups: this option allows you to specify a group of uses to schedule the resource if it is available. We always recommend the use of the Exchange static lists or security groups.
Resource Privacy Options
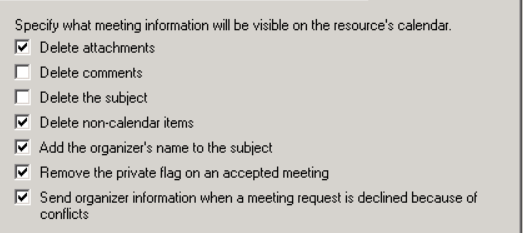
These options control the information included in requests and cancellations sent to the resource mailbox, which will affect the resource’s calendar settings not the calendars of the attendees. These settings is set by an Exchange administrator.
Response Message
Check the box labeled “Add additional text to be included in responses to meeting requests” and enter your message in the blank text box. This message will be sent with the automated responses sent from the resource mailbox.
Scheduling a meeting room in Outlook
The organizer would follow the following steps to schedule a meeting room:
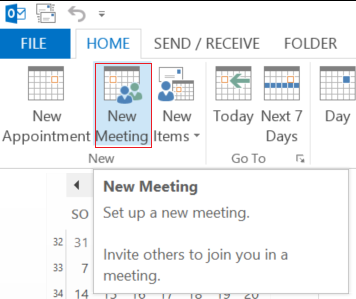
- Create a new meeting request from Outlook Calendar.
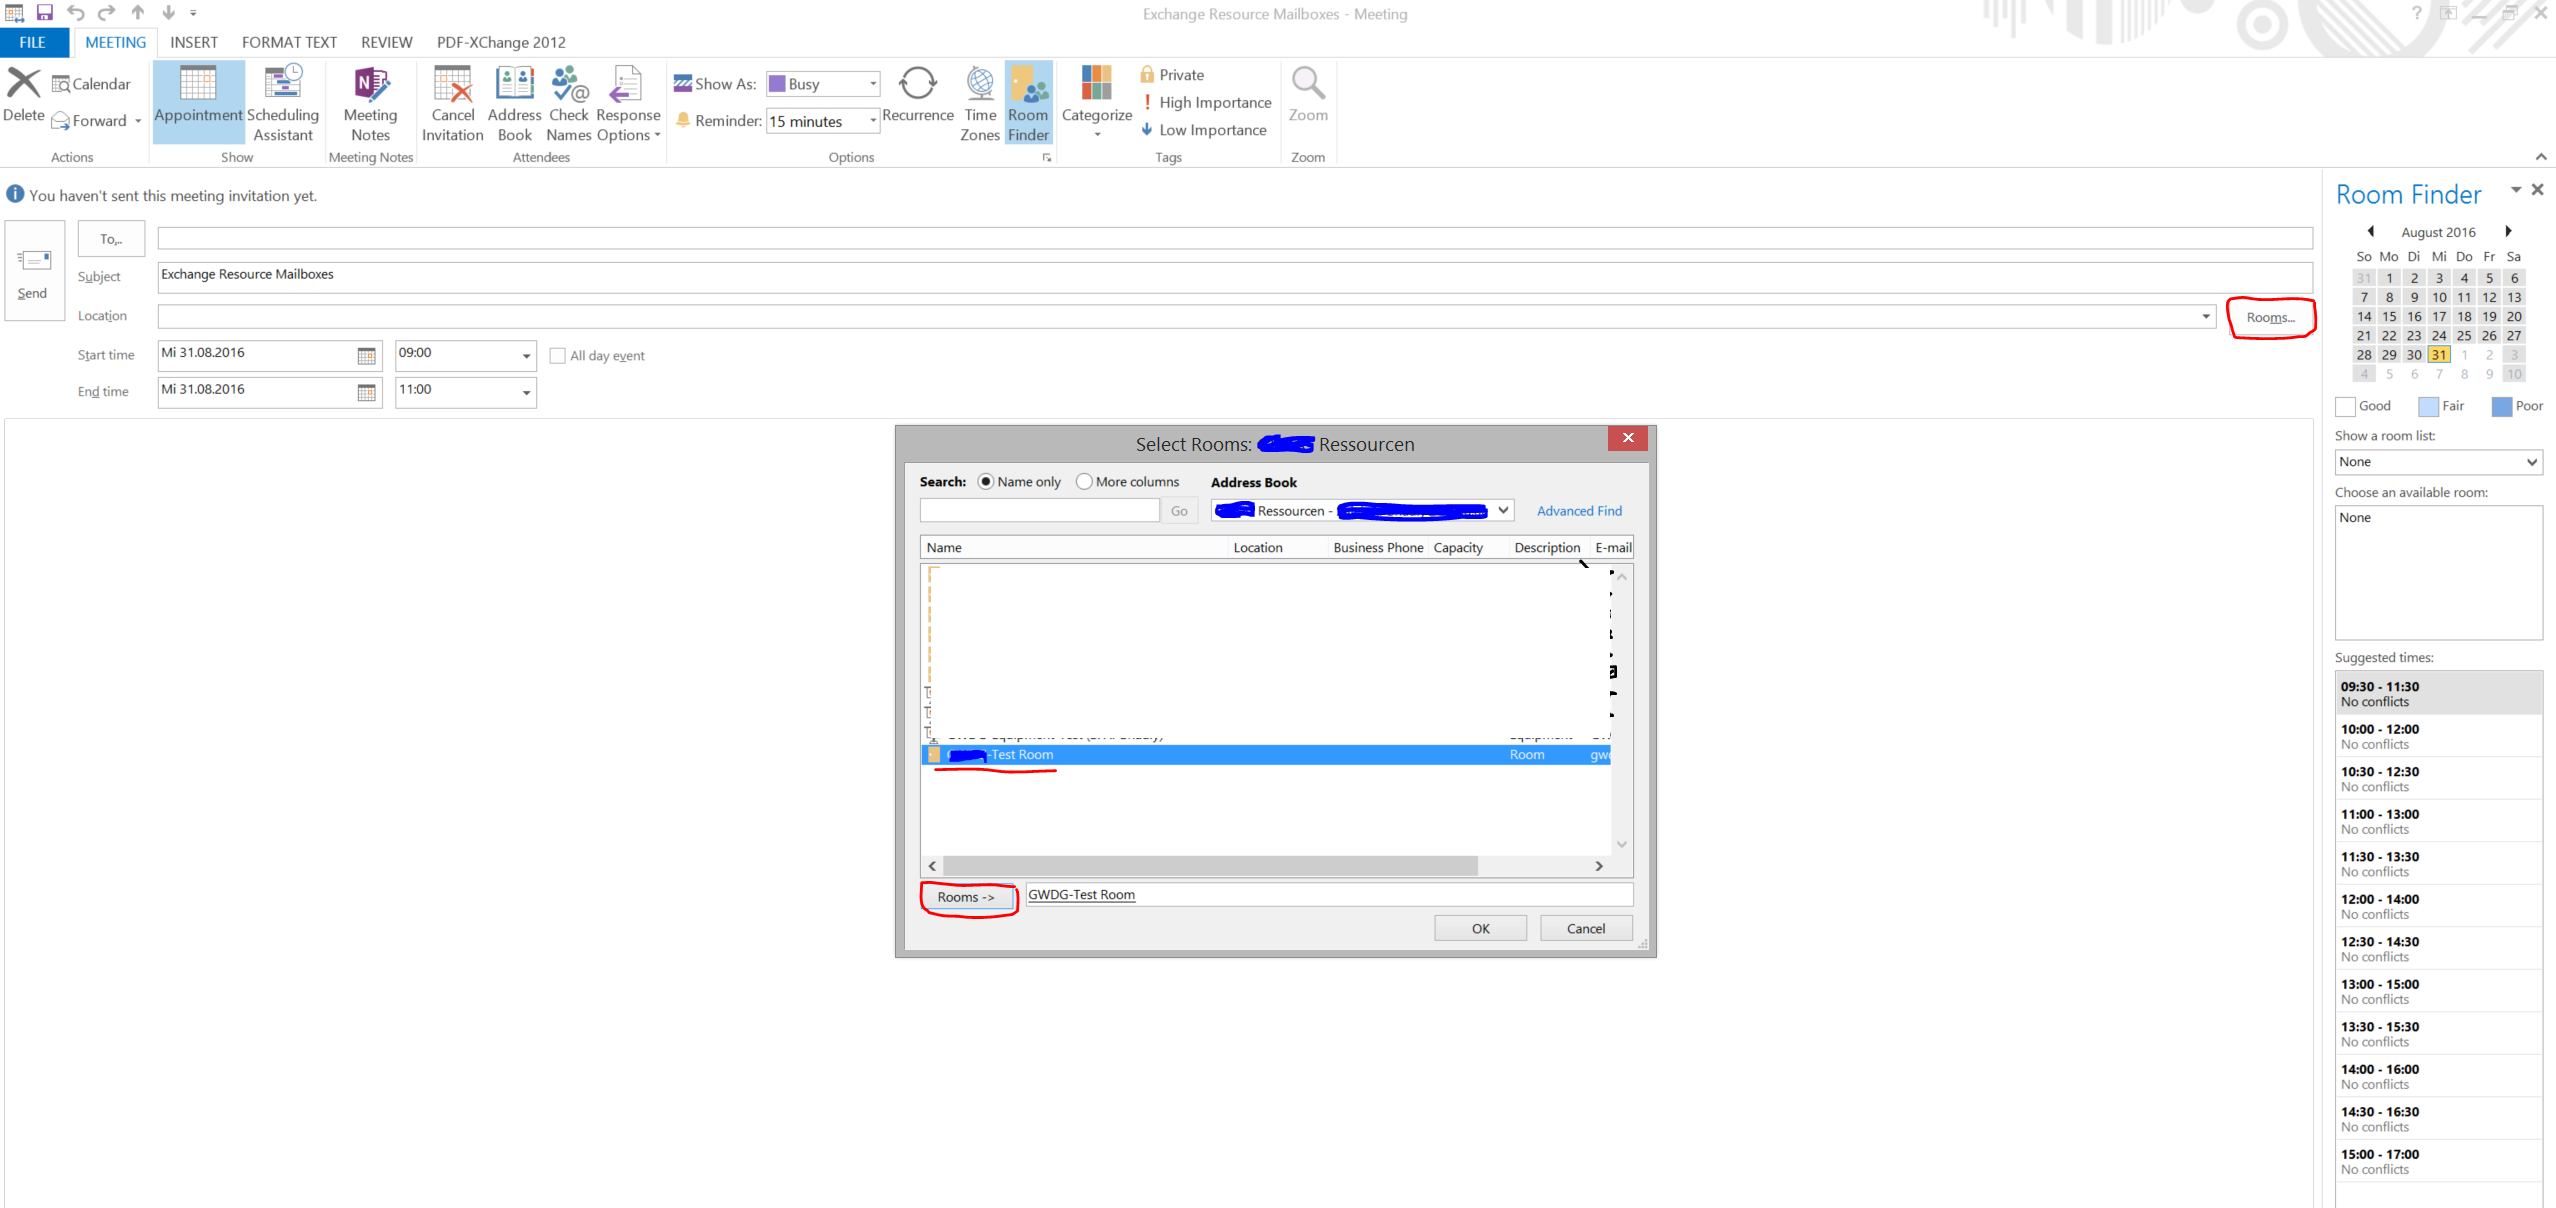
- Add the Meeting Subject in the Subject field and the meeting participants in the To field.
- Select the meeting room; by clicking the Rooms button, a list of available rooms will appear. Choose the meeting room and then click OK, the meeting room will be added to the list of participant in To field.
- Click the Schedule Assistant button to see the schedule assistant view and to verify the availability of the meeting room and the participants.
- Here also other meeting option can be set (e.g. recurrence options).
- Click Send to send the meeting request.
Depending on the resource mailbox configuration, the resource (room) could accept/reject the meeting automatically based on its availability or requires an approval from the resource mailbox delegate. If an approval is required, until the delegate accepts the request the meeting request will appear as tentative for the meeting participants.
Scheduling a meeting room in Outlook Web Access (OWA)
In in a similar procedure like with Outlook above, an organizer would follow the following steps to schedule a meeting room on OWA:
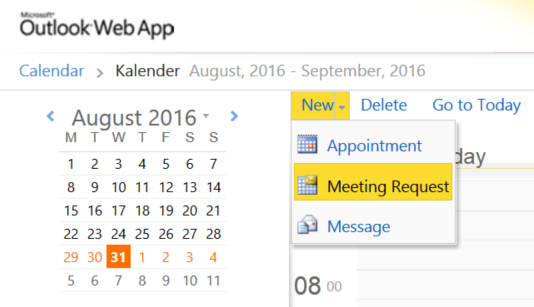
- From OWA Calendar choose New → Meeting Request.
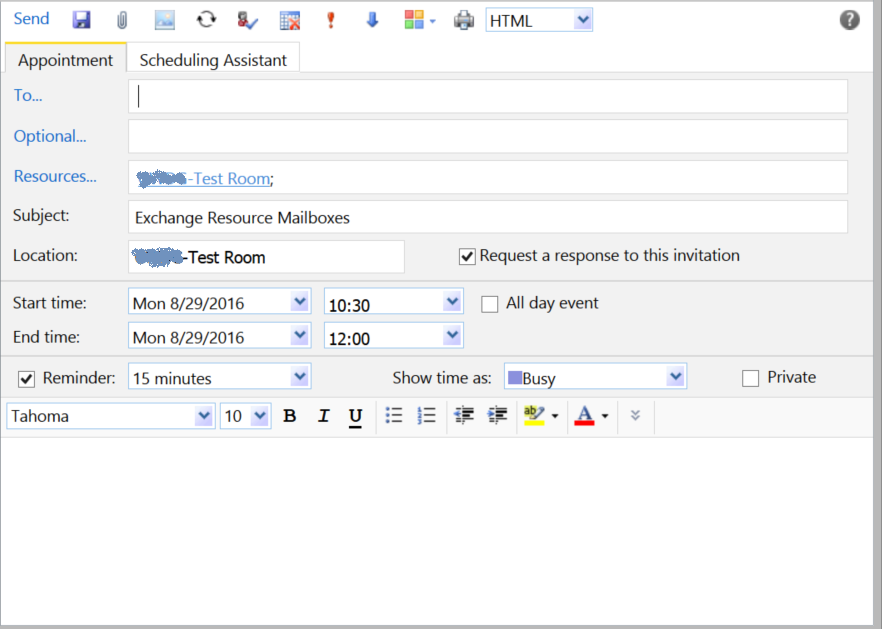
- Add the required participants and the meeting subject to the To and Subject fields, respectively.
- Type the name of the meeting room in the Resources field or click in Resources… button to open the list of rooms and choose the room from the list. The location will be auto-populated.
- Click the Scheduling Assistant to see the meeting details and verify the room availability.
- The other meeting options, like Recurrence, could be configured also.
- Click Send.
Similarly, all participants will see the meeting request. The request will be consider as tentative if an approval by the resource delegate is required.

